一、SELinux介绍
SELinux(Security-Enhanced Linux) 是美国国家安全局(NSA)对于强制访问控制的实现,是 Linux历史上最杰出的新安全子系统。NSA是在Linux社区的帮助下开发了一种访问控制体系,在这种访问控制体系的限制下,进程只能访问那些在他的任务中所需要文件。
SELinux是一种强制存取控制的实现,提供了一个架构来强制信息的分离,以对付入侵的威胁或任何企图略过安全架构的应用程序。
二、SELinux 的作用
SELinux 主要作用就是最大限度地减小系统中服务进程可访问的资源(最小权限原则)。
设想一下,如果一个以 root 身份运行的网络服务存在 0day 漏洞,黑客就可以利用这个漏洞,以 root 的身份在您的服务器上为所欲为了。是不是很可怕?SELinux 就是来解决这个问题的。
1、MAC(Mandatory Access Control)
由安全机制管理者来决定权限
2、DAC(Discretinoary Access Control)
由资源的拥有者决定权限
依赖于传统的User、Group、Other、Root账号
三、SELinux的工作模式
1、Linux权限首先被检查
如果Linux权限允许通过了,再检查SELinux;
2、SELinux是通过MAC的方式来管理程序
主体 (Subject)  SELinux主要管理的就是程序
目标 (Object)  主体程序访问的目标资源一般就是文件系统
策略 (Policy)  target  mls
四、SELinux启动和关闭
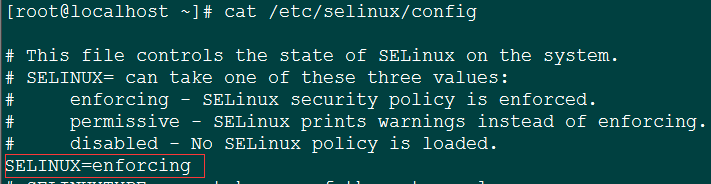
1、SELinux的三种模式
enforcing  强制模式
permissive  宽容模式
diabled   关闭
2、获取当前SELinux的模式
getenforce

3、设置启动策略
方法一 :使用命令,不用重启,临时生效。
usage: setenforce [ Enforcing | Permissive | 1 | 0 ] 0宽容模式,1强制方法二 :修改配置文件,重启后长期生效。
四、安全性环境

安全性环境用冒号分为三个字段:
1、身份识别(identify)
  root:表示root的账号身份
  system_u:表示系统方面的识别,通常是程序
  user_u:代表的是一般账号的身份
2、角色(role)
  object_r:代表的是文件或目录等文件资源
  system_r:代表的是程序
3、类型(type)
  type:在文件资源中称为类型
  domain:在主体程序中称为域
五、SELinux Type字段的相关性
主体程序在三个字段的对应意义

[root@localhost ~]# ll -Zd /data/ftphome /var/www
drwx------. safe safe system_u:object_r:default_t:s0 /data/ftphome
drwxr-xr-x. nginx nginx unconfined_u:object_r:httpd_sys_content_t:s0 /var/www
#两者的角色字段都是object_r,代表都是文件
#/data/ftphome属于default_t类型
#/var/www/属于httpd_sys_content_t类型
六、移动和复制对Type的变化
SELinux的Type字段会继承父目录
1、复制
Type字段会继承目标目录
2、移动
Type字段不变
结论:
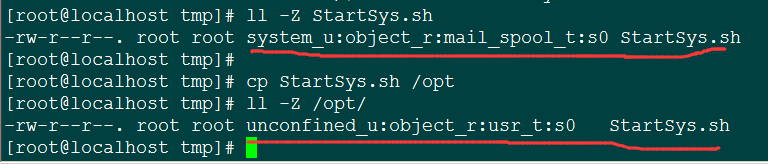
当你单纯的复制文件,SELinux的type字段是会 继承目标 的目录的;
当你移动文件,SELinux的type字段也 会被移动过 去。
七、SELinux Type的修改
1、chcon 语法
chcon [-R] [-t type] [-u user] [-r role] 文件
chcon [-R] –reference=范例文件 文件
参数说明:
 -R:连同该目录下的子目录也同时修改
 -t: 修改类型字段
 -u:修改身份识别
 -r:修改角色
 --reference=范例文件,拿某个文件当范例来修改类型字段。
2、chcon的使用
修改/tmp/hosts类型为net_conf_t的类型

[root@localhost tmp]# chcon -t net_conf_t /tmp/StartSys.sh
[root@localhost tmp]# ls -Z /tmp/StartSys.sh
-rw-r--r--. root root unconfined_u:object_r:net_conf_t:s0 /tmp/StartSys.sh
案例:将/tmp/hosts类型修改得与/var/spool/mail一致
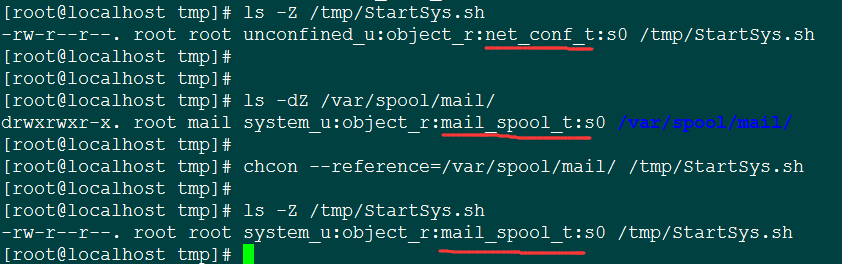
[root@localhost tmp]# ls -Z /tmp/StartSys.sh
-rw-r--r--. root root unconfined_u:object_r:net_conf_t:s0 /tmp/StartSys.sh
[root@localhost tmp]#
[root@localhost tmp]#
[root@localhost tmp]# ls -dZ /var/spool/mail/
drwxrwxr-x. root mail system_u:object_r:mail_spool_t:s0 /var/spool/mail/
[root@localhost tmp]#
[root@localhost tmp]# chcon --reference=/var/spool/mail/ /tmp/StartSys.sh
[root@localhost tmp]#
[root@localhost tmp]# ls -Z /tmp/StartSys.sh
-rw-r--r--. root root system_u:object_r:mail_spool_t:s0 /tmp/StartSys.sh
3、restorecon命令的使用
恢复为原有的SELinux Type
参数说明:
-R:连同子目录一起修改
-v:将过程显示到屏幕上
案例:恢复/var/www的Type类型
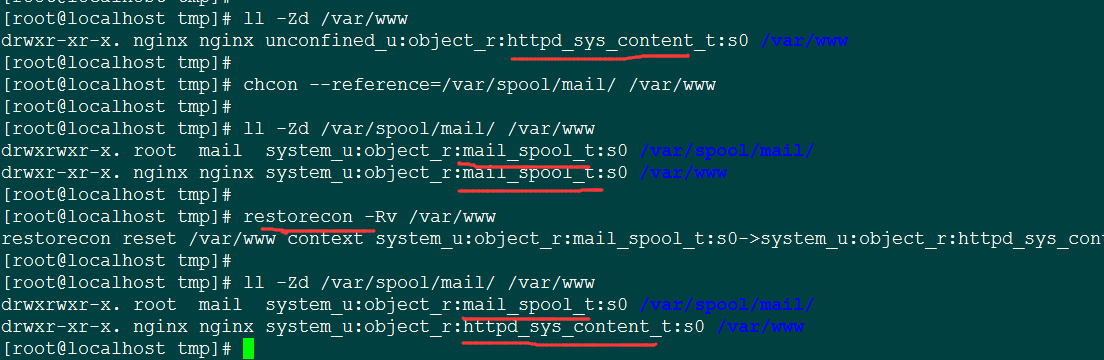
[root@localhost tmp]# ll -Zd /var/www     #查看类型
drwxr-xr-x. nginx nginx unconfined_u:object_r:httpd_sys_content_t:s0 /var/www       #类型为httpd_sys_content_t
[root@localhost tmp]#
[root@localhost tmp]# chcon --reference=/var/spool/mail/ /var/www       #将类型修改得与/var/spool/mail一致
[root@localhost tmp]#
[root@localhost tmp]# ll -Zd /var/spool/mail/ /var/www       #查看类型做个对比
drwxrwxr-x. root mail system_u:object_r:mail_spool_t:s0 /var/spool/mail/
drwxr-xr-x. nginx nginx system_u:object_r:mail_spool_t:s0 /var/www
[root@localhost tmp]#
[root@localhost tmp]# restorecon -Rv /var/www      #恢复类型
restorecon reset /var/www context system_u:object_r:mail_spool_t:s0->system_u:object_r:httpd_sys_content_t:s0
[root@localhost tmp]#
[root@localhost tmp]# ll -Zd /var/spool/mail/ /var/www    #查看类型做个对比,已经恢复
drwxrwxr-x. root mail system_u:object_r:mail_spool_t:s0 /var/spool/mail/
drwxr-xr-x. nginx nginx system_u:object_r:httpd_sys_content_t:s0 /var/www
4、semanager的使用
系统记录会默认的SELinux Type
ls /etc/selinux/targeted/context

使用semanager命令查看默认的SELinux Type
yum install policycoreutils-python -ysemanger命令参数说明
fcontext:主要用在安全性环境方面
-l:查询
-a:增加
-m:修改
-d:删除
semanager使用范例
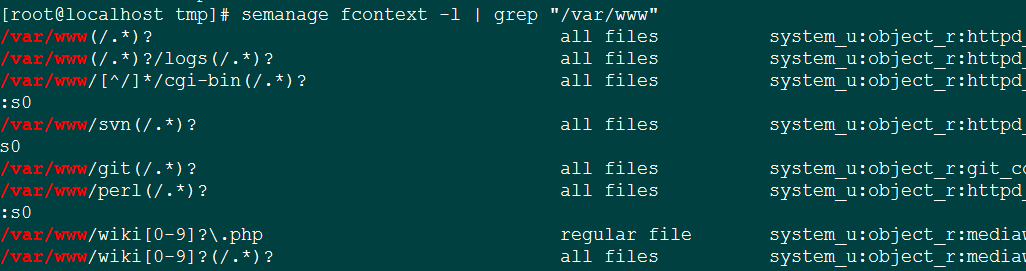
查询/var/www/的默认安全性环境
semanage fcontext -l | grep “/var/www”
例如,将/tmp/exam的类型设置为public_content_t,并要求该目录下所有新建的文件都是这个类型
semanage fcontext -a -t public_content_t "/tmp/exam(/.*)?"
所以,有semanager修改默认值,使用restorecon就比较简单。
八、策略查询
列出SELinux在此策略下的统计状态
列出与httpd有关的规则(boolean)有哪些
[root@localhost ~]# seinfo -b | grep httpd

httpd_dontaudit_search_dirs
httpd_manage_ipa
httpd_run_ipa
httpd_run_stickshift
httpd_use_fusefs
httpd_use_openstack
httpd_can_connect_ldap
httpd_setrlimit
httpd_enable_ftp_server
httpd_use_nfs

 ……省略部分内容……
查询详细的规则
sesearch命令
sesearch命令
–all 列出该类别或布尔值的所有相关信息
-t 类别
-b 布尔值
-t 类别
-b 布尔值
sesearch --all -t httpd_sys_content_t
sesearch -b httpd_enable_homedirs --all
九、SElinux下更改ssh端口
案例:将ssh服务的22端口更改为222端口
1、修改sshd_conf文件,添加端口(略);
发现SElinux未修改时,sshd修改了端口是无法启动的,继续到第3步。


2、修改iptables(略);
3、修改selinux配置:
首先,查看当前SElinux 允许的ssh端口:
semanage port -l | grep ssh
其次,添加222端口到 SELinux
semanage port -a -t ssh_port_t -p tcp 222然后,确认是否添加进去
semanage port -l | grep ssh
最后,再重启ssh服务,发现已经正常了。