一、工具简介
二、安装指南
(一)环境要求
(二)安装步骤
1、克隆项目仓库
git clone https://github.com/BINBIN02/YuanZhao.git
cd YuanZhao
2、创建并激活虚拟环境(可选,推荐),然后安装
python3 -m venv /opt/YuanZhao/venv
source /opt/YuanZhao/venv/bin/activate
pip install -r requirements.txt
三、使用方法
提前让AI构建几个 带暗链的测试文件
┌──(root㉿Kali-Linux-2025)-[/opt/YuanZhao/test]
└─# ll
total 16
-rw-r--r-- 1 root root  183 Nov 26 22:10 robots.txt
-rw-r--r-- 1 root root  205 Nov 26 22:11 sitemap.xml
-rw-r--r-- 1 root root 2221 Nov 26 22:09 test.html
-rw-r--r-- 1 root root  919 Nov 26 22:10 test.php
(一)本地文件扫描场景
# 基本扫描 - 单个HTML文件
python YuanZhao.py test/test.php
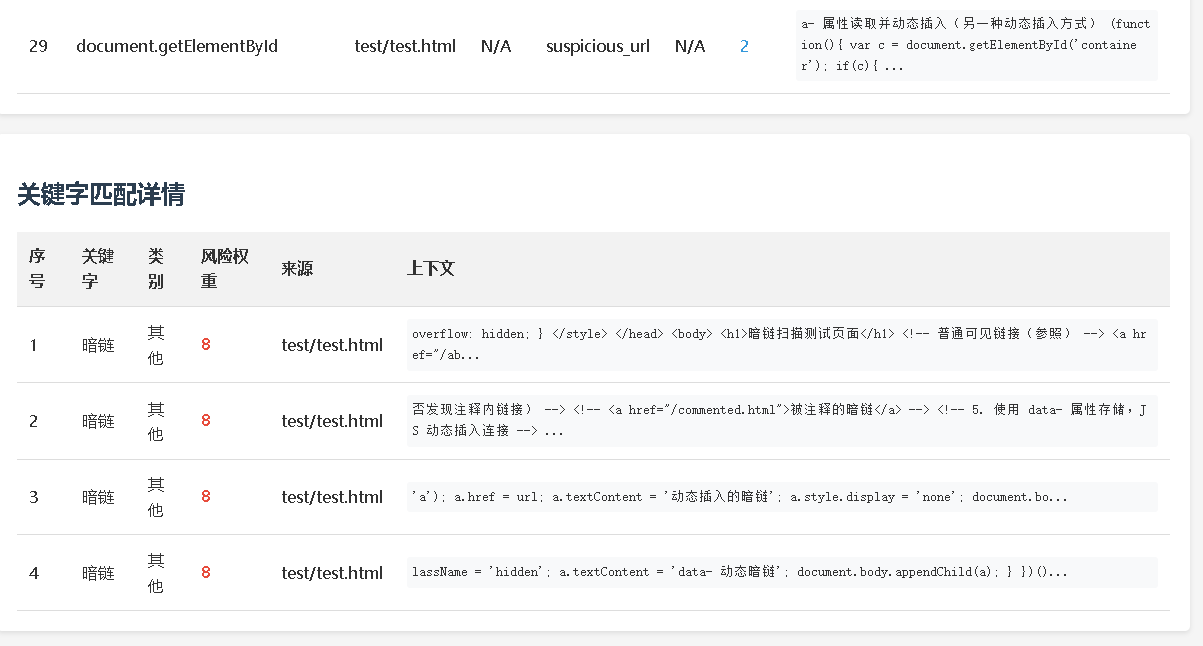
# 高级扫描 + HTML报告
python YuanZhao.py test/test.html -m standard -f html
# 详细日志模式
python YuanZhao.py /path/to/suspicious.html --verbose
# 自定义输出目录
python YuanZhao.py /path/to/file.html -o /custom/report/dir
# 特定报告格式(JSON)
python YuanZhao.py /path/to/file.html -f json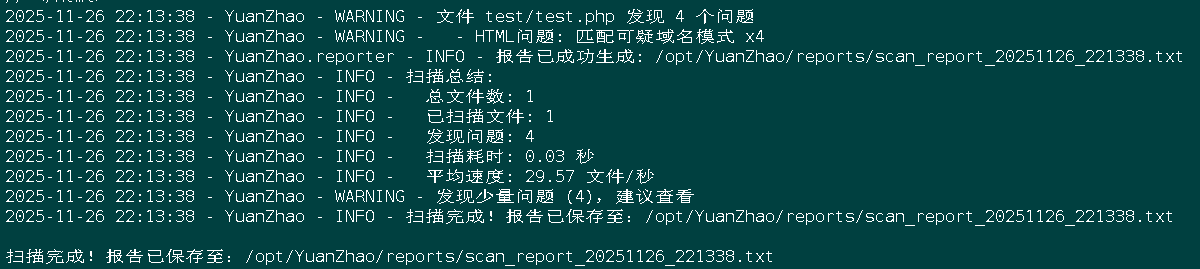
(二)本地目录扫描场景
# 默认深度扫描目录 + HTML报告
python YuanZhao.py test/ -m standard -f html
# 自定义深度扫描(仅当前目录和一级子目录)
python YuanZhao.py /path/to/website -d 1
# 深度递归扫描
python YuanZhao.py /path/to/website -d 5

# 排除特定文件/目录
python YuanZhao.py /path/to/website --exclude "*.jpg" "*.png" "logs/*" "vendor/"
# 调整线程数(提高性能)
python YuanZhao.py /path/to/website -t 16
# 完整模式 + 多格式报告
python YuanZhao.py /path/to/website -m deep -f html -o security_reports --threads 12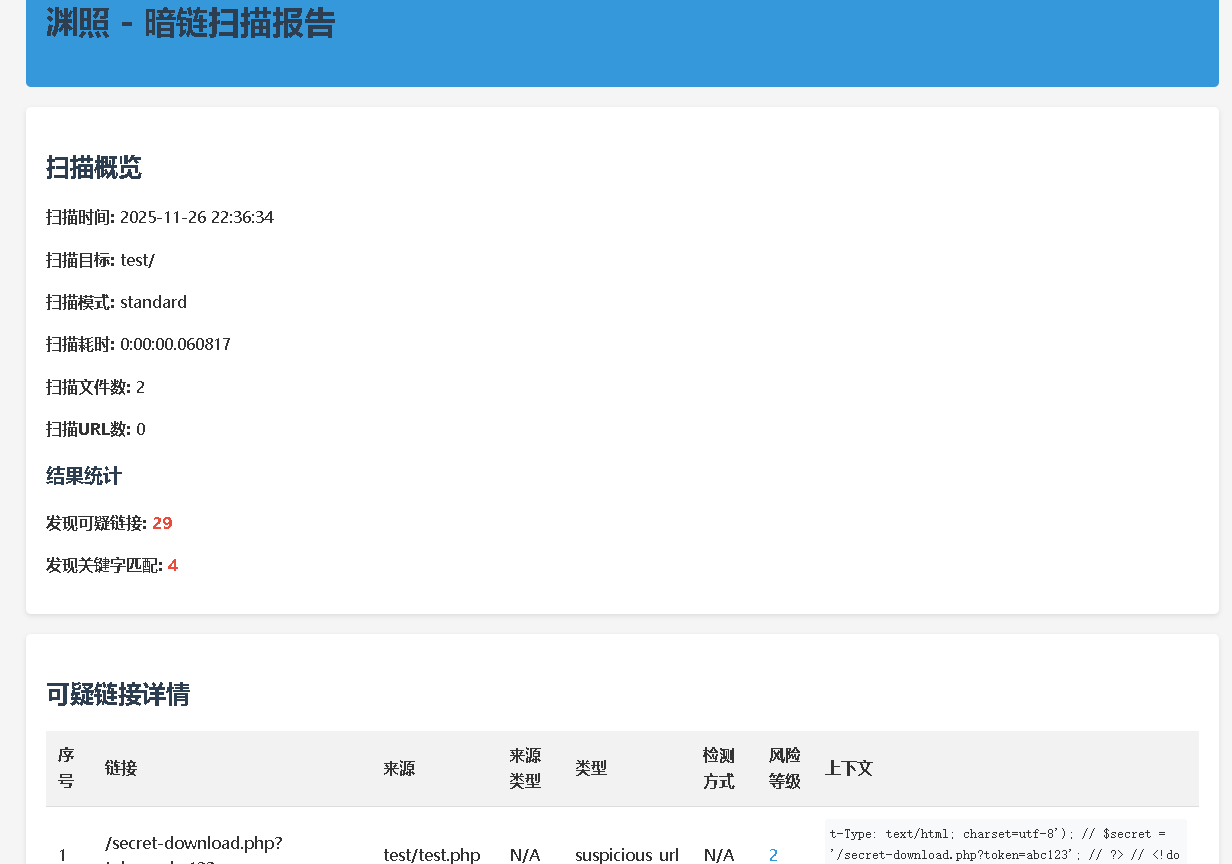
(三)网络URL扫描场景
# 基本网站扫描
python YuanZhao.py https://www.baidu.com  -m standard -f html
# 内网地址扫描
python YuanZhao.py http://192.168.1.100
# 本地开发服务器扫描
python YuanZhao.py http://localhost:8080

# 带路径的URL扫描
python YuanZhao.py https://example.com/news/article
# 设置超时时间(公网默认使用全局超时,内网未显式设置时会按较长超时)
python YuanZhao.py https://example.com --timeout 60
# 使用代理服务器
python YuanZhao.py https://example.com --proxy http://127.0.0.1:8080
# 带认证的代理
python YuanZhao.py https://example.com --proxy http://username:password@proxy.example.com:8080
(四)高级功能场景
# 无头浏览器扫描(动态内容)
python YuanZhao.py https://dynamic-website.com --headless
# 无头浏览器 + 延长等待时间
python YuanZhao.py https://heavy-js-website.com --headless --js-wait 10
# 无头浏览器超时时间
python YuanZhao.py https://example.com --headless --headless-timeout 120
# 自定义关键字检测
python YuanZhao.py /path/to/target --keyword-file custom_keywords.txt
# 基础模式快速扫描
python YuanZhao.py https://example.com -m fast -d 1 -t 5
# 全部模式深度扫描
python YuanZhao.py /path/to/important-site -m deep -d 3 -f html --verbose
(五)主要参数说明
基本参数
target: 扫描目标(文件路径、目录路径或URL)- 必需参数-d, --depth: 递归扫描深度(默认:3,0表示仅扫描当前文件/目录)-m, --mode: 扫描模式(fast/standard/deep,默认:deep)-t, --threads: 并发线程数(默认:8)
报告相关参数
-o, --output: 报告输出目录(默认:./reports)-f, --format: 报告格式(txt/html/json/csv,默认:txt)
网络相关参数
--timeout: 请求超时时间(秒,默认:30)。公网目标默认使用此值,内网目标未显式设置internal_timeout时按较长超时(约为全局超时的两倍)。--proxy: 代理设置(支持带认证与不带认证的HTTP代理),示例:http://127.0.0.1:8080或http://user:pass@host:8080
高级参数
--keyword-file: 自定义关键字文件路径--exclude: 排除的文件或目录--verbose: 显示详细日志信息--no-color: 禁用彩色输出(适用于自动化脚本)
无头浏览器参数
--headless: 启用无头浏览器扫描--browser-type: 无头浏览器类型(支持: chrome,默认: chrome)--js-wait: JavaScript执行等待时间(秒,默认: 3)--headless-timeout: 无头浏览器超时时间(秒,默认: 60)--headless-binary: Chrome二进制路径(例如:C:\\Program Files\\Google\\Chrome\\Application\\chrome.exe)--headless-driver: ChromeDriver路径(例如:C:\\drivers\\chromedriver.exe)
(六)常见问题解答
Q: 扫描结果中的误报如何处理?
A: 可以通过创建自定义关键字文件调整特定关键词的风险权重来减少误报,或结合扫描模式选择更精确的扫描策略。
Q: 如何提高大型网站的扫描效率?
A: 增加线程数、设置合理的爬取深度,或先使用基础模式(fast)进行初步筛选。对于公网网站,建议控制扫描范围。
Q: 为什么有些动态生成的链接没被检测到?
A: 启用无头浏览器模式--headless并适当增加JavaScript执行等待时间--js-wait。
Q: 使用无头浏览器时需要注意什么?
A: 使用无头浏览器会增加资源消耗和时间,建议适当降低线程数,为复杂页面增加等待时间,仅在必要时启用。
四、许可证与免责声明
本工具仅供安全测试和应急响应使用,请确保您有足够的授权对目标进行扫描,避免对未经授权的系统进行测试。